


Psst! This page contains affiliate links, which means that I may earn a small commission, at no cost to you, if you make a purchase through a link. By doing so, you’re helping me pay my biz bills (and to drink coffee; lots of coffee, & to keep buying design books and art supplies, which I love). Learn more in my Affiliate Disclosure.
Have you ever wondered how to make your own photo props for your branding photography? If you’re always looking for ideas for photography props to include in your brand photos, you can start by creating your own.
Why? Because in that way, you will have photo props that no one else will have, and that will make your website photos stand out more in a sea of sameness.
I don’t know about you, but I’m tired of looking at the same styled desktop images around the web (white background, anyone?)
Now, I do use a white background sometimes in my branding photo shoots, and also in my styled stock photo bundles that are available in the shop, but not always. There are lots of options available for you to get creative with your photos.
That’s why in this post, I’m going to show you how to create your own photography props with Canva, a free graphic design software.
So grab your cup of coffee (or tea), and let’s start. ☕ 🍵 Ready?
I feel like I should say this first. 🤣🤣🤣
The Canva app is optimized for creating content for web and digital devices. However, you will be able to print your document at home or send it to a print shop with a couple of adjustments.
The reason why I wrote this tutorial with Canva and not with another app is that many creative entrepreneurs are already using Canva, so they are familiar with it.
And also because I couldn’t find another similar app that would allow downloading a PDF print file with many pages on the free plan.
Let me know if you find one and I’ll check it out.
All the documents that you design in Canva are in the color profile RGB. However, print documents should be in the color profile CMYK.
If you’re designing in RGB, the colors in your document will look brighter than when using the same hex code in CMYK.
So when you print your document, the colors will look different and duller than what you see within Canva. I’ll show you how to convert your document from RGB to CMYK at the end of this post.
Update:
If you have Canva Pro (the paid version of Canva), you can now select CMYK color profile (best for printing) instead of RGB color profile (best for web) before you download your document.
If you’re happy with a free Canva account, don’t worry. I have instructions for converting your document for printing at the end of this blog post, for free. 😉
Another thing to consider is the printing area in the document. Canva lets you see the margins, but you can’t modify them.
The problem with this is that there’s no way to know if everything in the page will be printed. A workaround for this is to create rulers. I’ll show how to do this later in the blog post.
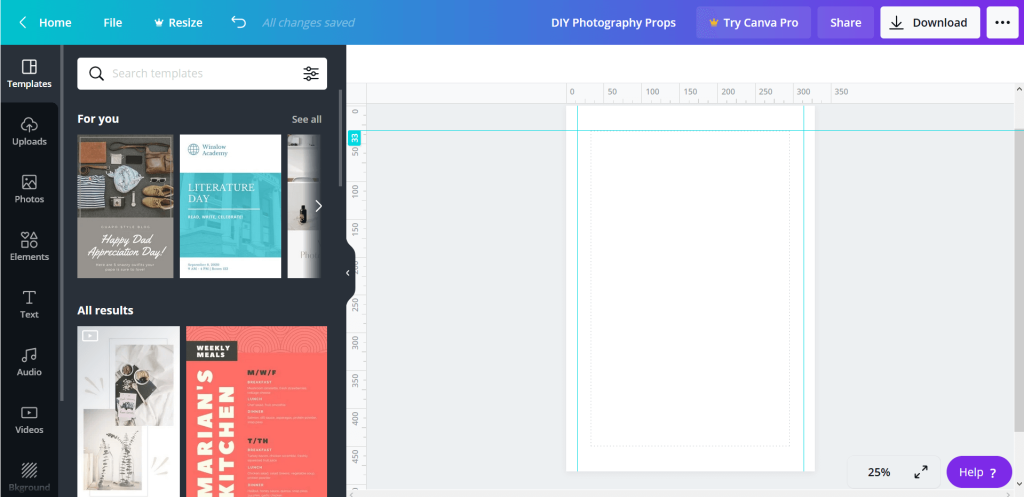
Go to Canva and login to your account. For this tutorial, I’m going to use the free version, but you can replicate the steps with a free or paid account.
Click on the button “Create a design” in the top right corner, and then select “Custom size”.
In this post, I’m using an A3+ page size (I usually go to a print shop where they print documents in A3+ page size), but if you’re going to print your photography props at home, select the size of the paper that you have.
It could be A4 or Letter size, depending on the standard paper where you live.
If you’re going to send the file to a print shop, check the size of paper that they have available first, and also the printing area, or else you run the risk of having your design cut.
The printing area determines the margin that you have to leave in the page borders.
Here are a couple of different sizes to choose from:
A3+: 329 x 483 mm
A3: 297 x 420 mm
A4: 210 x 297 mm
Letter: 216 x 279 mm
Ideally, you want to choose a page size that allows you to print more photo props in one page; that’s why I choose A3+.
The quality of the paper that you’re going to use for printing is important too.
For example, when I print pages with photos with a Polaroid-like style or with a photo booth style, I choose a thick satin paper (300 g).
When I design postcards with my own brand photos and travel photos, I choose a thick opaline paper (250 g).
The reason why I prefer printing my own photography props in thick paper is because I don’t want them to bend easily.
When you write the custom size of your document in Canva, don’t forget to change “px” for “mm”.
If you’re going to print in A4 or Letter size, type that in the search box in Canva and select a blank document, instead of writing a custom size.
You will see “Untitled design – 329 x 483 mm” (or whatever size you chose) as the name of your document in the middle of the top bar. Click there to change the name of your document.
I’m going to name mine “DIY Photography Props”.
Click on “File” in the top left corner menu. Then select “Show margins”.
The problem with the margins in Canva is that you can’t modify them.
This may create a problem when you want to send the file to a print shop, because you won’t know whether the document will have all the elements within the printing area.
And even if you want to print your file at home, you will need to adjust the margins to a printing area too.
A workaround for the problem with margins is to create rulers to simulate the right margins, and design only in the blank space within the rulers.
In my case, I need a printing area of 300 mm x 430 mm, so I’m going to move the rulers to get that area on the page.
Your printing area will be different, depending on the size of the paper that you selected and the print shop or your home printer. Make sure that you know the printing area before arranging the rulers on the page of your document.
Position the arrow over the ruler on the left, and then click and drag the ruler until it’s in the position that you need it to be.
For example, in my case, the page width is 329 mm, and the printing width is 300 mm. That gives a total margin of 29 mm. If I divide it by two, I get a right and left margin of 14,5 mm each. So I’m just going to place the left ruler at 15 mm, and the right ruler at 314 mm.
Next, position the arrow over the ruler above the page document, and then click and drag the ruler until it’s in the position that you need it to be.
For example, in my case, the page height is 483 mm, and the printing height is 430 mm. That gives a total margin of 53 mm. If I divide it by two, I get a top and bottom margin of 26,5 mm each. So I’m just going to place the top ruler at 27 mm, and the bottom ruler at 456 mm.
Actually, when I try to place the ruler at 27 mm, I freaking can’t. It goes from 26 mm to 33 mm. So I’m going to select 33 mm. If I selected 26 mm instead of 26,5 mm, my design could be outside of the printing area, and I don’t want to risk it.
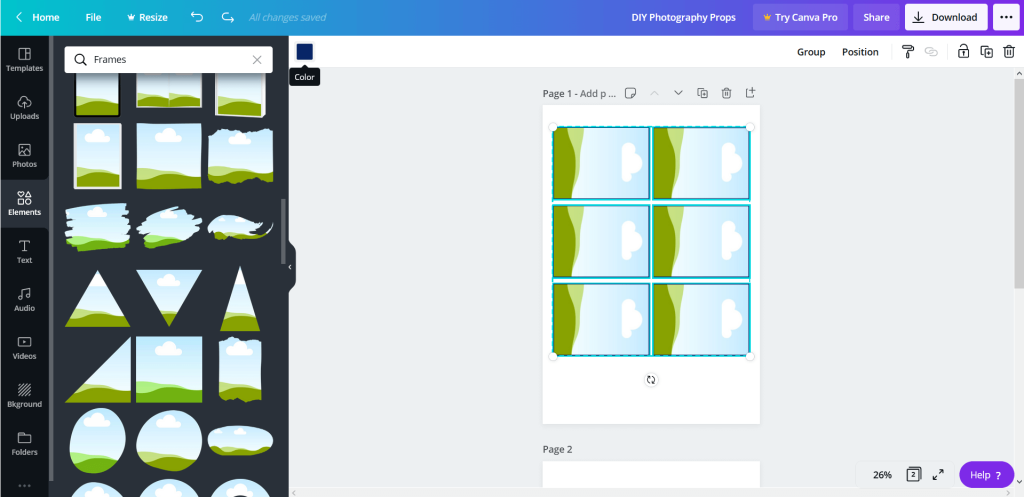
Click on “Elements”, in the menu in the left corner, and then select a vertical rectangle in “Frames”.
Drag the corners of the frame to change the size. You need a 148 mm x 105 mm rectangle to simulate a postcard in standard size.
Unfortunately, there’s no way to change the size exactly how you want it to be on Canva.
2023 quick update:
There’s a new option to change the size of a shape in Canva.
If you click on “Position”, at the top menu, you’ll get access to an “Advanced” menu where you can choose a custom size for your shape.
Drag the shape by the arrows below to change the orientation, until it’s positioned at 90 degrees.
Move the frame, so that it’s positioned beside the top and left rulers.
Now right click on the frame and select “Copy”.
Select Ctrl + V or Command + V to paste a new frame on the page, and then move the frame, so that there’s white space between the frames on the page. Repeat this process until you have your page full of frames within the printing area.
Select all the frames and then click on the little square in the top left corner, to change the color of the frames.
If you want to choose a specific color from your color palette, click on “New color” and write the hex code.
It may happen that, without realizing it, you may change the color of the whole frame in all cases, but once you add your image in each one, only the border of the frames will keep this color.
I did this without realizing it, so I changed the color of the middle of the frames to white.
Now click on “+ Add page” below the page you’re working on.
Select a horizontal rectangular frame with a different border or without a border. In this case, I chose a frame that has no border.
Drag the corners of the frame to change the size. Remember that you need a 148 mm x 105 mm rectangle to create a postcard in standard size.
2023 update: Click on Position, at the top menu, and change the size of the rectangle in the “Advanced” options.
Move the frame, so that it’s positioned beside the top and left rulers.
Next, right click on the frame and select “Copy”.
Select Ctrl + V or Command + V to paste a new frame on the page, and then move the frame, so that there’s white space between the frames on the page.
Repeat this process until you have your page full of frames within the printing area, like you did in the prior page.
Don’t worry about the excessive white space at the bottom of both pages; we’ll make good use of that space later.
Click on “+ Add page” to insert another page in your document.
On this page, we will create mini postcards.
Click on “Elements”, in the menu in the left corner, and then select a square with a border in “Frames”.
Next, drag the corners of the square to reduce the size, until it’s approximately 70.
2023 update: Click on Position, at the top menu, and change the size of the square in the “Advanced” options.
If the border of the frame is white, change the color by clicking on the little rectangle in the top left corner. You can also write the hex code of a color by clicking on “New color”.
In this case, you could use a different color from your color palette than the one that you used in the postcards. I usually use different pastel colors from my color palette for the borders of my props, because this gives me options when I want to take my brand photos.
Now right click on the frame and select “Copy”.
Select Ctrl + V or Command + V to paste a new frame on the page, and then move the frame, so that there’s white space between the frames on the page.
In this case, I didn’t add another frame because there wasn’t enough white space between them. So what I’m going to do is to reduce the size of all the frames a little bit.
If you want to do the same thing, select all the frames, to keep the same size for all of them.
Then right click to copy a frame and select Ctrl + V or Command + V to paste it. In that way, you’re making good use of the printing area in the page.
If you want, you can choose border colors for each frame.
Remember that you can change the color of each frame by clicking on the little rectangle in the top left corner. You can also write the hex code of a color by clicking on “New color”.
Select all the frames and right click to copy them. Paste them below and repeat this process until you have your page full of frames within the printing area.
Click on “+ Add page” to insert another page in your document.
On this page, we will create images similar to the ones printed with Polaroid cameras (which I love; my dad had one when I was little).
Click on “Elements”, in the menu in the left corner, and then type “frames Polaroid” in the search bar at the top. Then choose a frame that you like.
In my case, I selected one that has a squared space for the image in the middle.
Next, drag the corners of the frame to reduce the size, until the height is approximately 100.
2023 update: Click on Position, at the top menu, and change the size of the frame in the “Advanced” options.
Move the frame, so that it’s positioned beside the top and left rulers.
If the border of the frame is white, change the color by clicking on the little rectangle in the top left corner. You can also write the hex code of a color by clicking on “New color”.
Now right click on the frame and select “Copy”.
Select Ctrl + V or Command + V to paste a new frame on the page, and then move the frame, so that there’s white space between the frames. Repeat this process with a third frame.
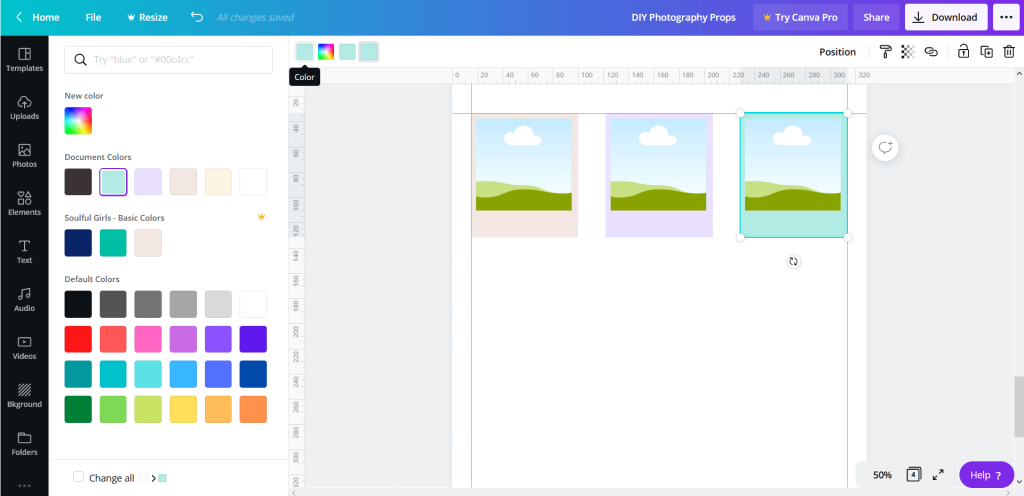
Like you did in the prior page, you can choose border colors for each frame. In order to do so, click on the little rectangle in the top left corner. You can also write the hex code of a color by clicking on “New color”.
What I noticed in this case is that there were shadows created with black and white. I didn’t want them, because I use flat elements in my brand. I only create shadows for my mockups.
So I clicked on the colored squares in the top menu and changed the colors to the ones corresponding to each frame.
Select all the frames and right click to copy them. Paste them below and repeat this process until you have your page full of frames within the printing area.
Click on “+ Add page” to insert a new page in your document.
On this page, we will create images similar to the ones printed in photo booth sessions.
Click on “Elements”, in the menu in the left corner, and then type “frames photo booth” in the search bar at the top. Then scroll down until you find a frame with space for three images.
Next, drag the corners of the photo booth frame to reduce the size, until it’s approximately 65 x 200.
2023 update: Click on Position, at the top menu, and change the size of the photo booth frame in the “Advanced” options.
Move the photo booth frame, so that it’s positioned beside the top and left rulers.
If the border of the photo booth frame is white, change the color by clicking on the little rectangle in the top left corner. You can also write the hex code of a color by clicking on “New color”.
Now right click on the frame and select “Copy”.
Select Ctrl + V or Command + V to paste a new photo booth frame on the page, and then move the frame, so that there’s white space between both frames. Repeat this process with two more frames.
You can choose different border colors for each frame. In order to do so, click on the little rectangle in the top left corner. You can also write the hex code of a color by clicking on “New color”.
I don’t like the shadows in the frames, so I’m going to remove them by clicking on the colored squares in the top menu and changing the colors to the ones corresponding to each frame.
And lastly, select all the frames and right click to copy them. Paste them below and repeat this process until you have your page full of frames within the printing area.
Remember the white space in the first two pages? Now we’re ready to make good use of it.
Go to the third page with the mini postcards, select four of them, and copy them.
Then go back to page 1, click on it, and paste the mini postcards. Move them to the white space at the bottom of the page.
Now click on page 2 and repeat the process.
So far, your pages will look similar to the image below, only with frames, and without any photo.
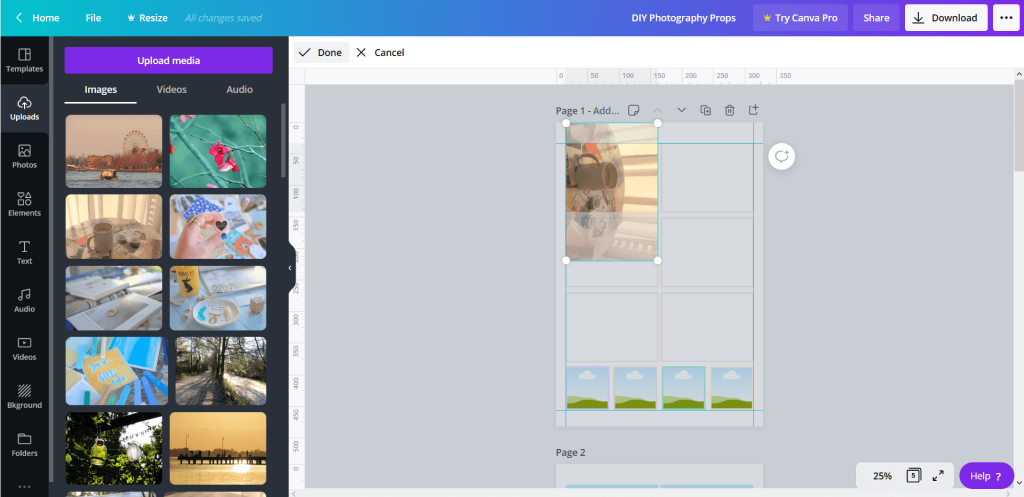
Go back to the first page of your document, because it’s time to upload your brand photos.
Click on “Uploads”, on the left side, and upload many of your brand photos by clicking on “Upload media”, or choose a photo that you’ve already uploaded.
Pro tip: Try to create your photography props with your own images. You can choose your own profile photos, lifestyle photos, brand photos, or photos from your trips.
Try to avoid choosing free stock photos for this, because everyone is using those photos and you’re never completely sure of the terms of use.
Instead, you can select paid styled stock images that have the style of your brand, because there’s less chance that other people will be using those photos.
But please check the license of the photos first, to make sure that you’re allowed to print them and use them as props in your photos. For example, you can do this with my styled stock photo bundles that are available in the shop.
As long as you print them to use as photography props in your photos (and you don’t print them on products for selling, like mugs or calendars), you’re covered by my standard image usage license.
There’s no need to change the orientation of the image. Once you place the photo inside the frame, the orientation will automatically change to the one corresponding to the frame.
If you want to change the position of the image inside the frame, double click on the image and move it to the left or the right. To save the changes, double click on the image again, or select “Done”.
Repeat this process until you have images in all the frames in the document.
Once you complete the steps, the document will look like the image below, with all the photos inside the frames.
YAY! You’re so close to getting this done!
Once you make sure that all the frames have images, click on “Download”, in the top right corner. In file type, select “PDF Print”, and then “Download” (if you have Canva Pro, select CMYK as the color profile to avoid the next step).
This is super important: As you’re going to print this document, it has to be optimized for printing. That’s why you have to choose CMYK instead of RGB as the color profile.
However, when you create a design in Canva, and even when you download it for print, if you’re using a free account, the color profile is still in RGB.
That’s why you have to convert the color profile to CMYK after you download the PDF. But if you have Canva Pro, you can select CMYK before downloading.
You can convert the file from RGB to CMYK online with this PDF converter (maximum file size 20 MB) or with this other PDF converter (my PDF file was 39.5 MB and I could upload it and convert it without restrictions).
YAY! You did it! You have your brand photography props ready to print. Congrats, beautiful!
7 Prop Ideas For Your Brand Photo Shoot (Part 1) – The Stationery Edition
10 Prop Ideas For Your Brand Photo Shoot (Part 2) – The Art Supply Edition
10 Prop Ideas For Your Brand Photo Shoot (Part 3) – The Home Decor Edition
7 Prop Ideas For Your Brand Photo Shoot (Part 4) – The Kitchen Edition
I hope that was useful to you!
Remember that you can get my styled stock images and use them as photography props in your next branding images. 😉 😻
With all my love,
Giselle
Hi, beautiful! I’m Giselle.
I provide female entrepreneurs, like you, beautiful and soulful images and Canva templates that they can use in their personal brands. I also write resource tutorials and reviews to make your blogging life easier.
If you enjoy my blog posts and free resources, please consider buying me a coffee. Your contribution helps me pay my biz bills and dedicate time to create new content.
Want to design a pretty and consistent brand easily? Focus on providing high value only, because I’ve done the design work for you. 😎
Psst! This page contains affiliate links, which means that I may earn a small commission, at no cost to you, if you make a purchase through a link. By doing so, you’re helping me pay my biz bills (and to drink coffee; lots of coffee, & to keep buying design books and art supplies, which I love). Learn more in my Affiliate Disclosure.
Try Flodesk for free and get 50% off during the first year of your subscription with my coupon code SOULFULGIRLS at checkout. (Affiliate link).
You're light in the world, so shine
This website is not affiliated with Canva in any way.
Made with 💙 by Giselle Rondoletti (hi! That’s moi) in Buenos Aires, Argentina.
100% written by a human, and it will continue to be that way. 😎
© 2020-2024 Soulful Girls Studio. All rights reserved.